Thursday, December 3, 2009

It's done.

Eleven inches wide.

Thanksgiving and Whoscarf 071

Eleven feet long.

Thanksgiving and Whoscarf 219

Thanksgiving and Whoscarf 163

One hundred and sixteen ends carefully hidden with an embroidery needle.

Thanksgiving and Whoscarf 092

Over the 265 days of knitting, I kept a spreadsheet with how many rows were knit on each day. Yes, I really did!

Whoscarf chart

Thanksgiving and Whoscarf 214

Thanksgiving and Whoscarf 190

I made this for a friend to give her husband for their wedding anniversary. She says he loves it!

Details here and here.

Monday, November 30, 2009

Light

A couple weeks ago I entered a contest over at The Periwinkle Sheep blog. I didn't win, but I was a runner-up and the prize turned out to be a skein of Karin's hand dyed yarn. I picked it up on a lovely day for a trip to the yarn store and marveled at the colors. Karin probably doesn't know that orange is one of my favorite colors (yes, I know that is weird!) or that I've been keeping an eye on her yarns for a while, waiting for one of them to speak to me (um, metaphorically anyway). This colorway, a special edition, was utterly, completely perfect in every way, except for one thing:

Thanksgiving and Whoscarf 038

I find it impossible to photograph well.

I've tried natural light. I've tried various configurations of the flash on the camera and the extra flash I have.

Thanksgiving and Whoscarf 046

The opportunity to photograph yarn in my house is generally short lived, between the shorter days, the energetic two-year-old, the newly mobile six-month-old, the cats, the cats' hair, the vacuuming, the toys, the teething... but what I really need is another brilliant sunny day and to figure out how to capture the glow. I'm still looking for just the right pattern. It has to be good.

Thank you, Karin! In case you can't tell, I love it! :)

Monday, November 23, 2009

Whoscarf, revisited

I finished the knitting on the Whoscarf on November 10. All I have to do is hide the ends, do a little light blocking, and add the fringe.


All those color changes leave two ends to hide, plus the cast on and bind off, plus there were some occasions when I needed to change balls of yarn of the same color... and this means that I have quite a bit of time to spend with my darning needle.

105

I've kind of hit a stride, though, and it's going quite well. I'm almost done, which means I have to start thinking about just how to photograph it and just how much insurance to get on the package when I mail it.

Thursday, November 19, 2009

Notes of late

If you stop by and scroll down on this page, you'll see in the column on the right a little section with my current works in progress (WIPs) that changes pretty frequently as I work on things. A couple projects flew through so quickly lately that I forgot to even mention them here, so I'm going to give a quick rundown of the parade of finished objects.

A couple of crocheted potholders:

001

A chapstick holder made from these detailed directions:

009


A washable cotton Swiffer cover from this pattern:

011


Some crochet socks for Zee out of a sport weight superwash electric orange yarn that matches NOTHING but itself:

073


An Irish Hiking Hat for my friend Jenn:

028


Crochet holiday wreaths made on milk jug rings:

017


The Wave Hat for Spike:

011fix

This was my second colorwork hat out of Suri Merino and I really enjoy working with the yarn and the snuggly finished products!

Wednesday, September 30, 2009

Rainbow Cupcakes

Inspired by a photo a friend found online, I made rainbow cupcakes for a party this summer. I was aiming to have about 30 cupcakes so I used two boxes of cake mix and made two batches of frosting. I probably could have gotten away with one batch of frosting, but I haven't made them again to be sure. Anyway, here are some notes about the process.

Photobucket

I promise, it's not as hard as it sounds!

Follow the directions for a regular old yellow cake mix BUT however long it says to mix it (mine said on low until combined, then medium for 2 minutes) you want to short it. If you overmix cake batter you get tunnels in the cake, and since this cake batter was going to be dyed and you have to mix in the dye I didn't want to push it. So I mixed on medium for 1min 30sec. Then I poured cake batter into 5 cereal bowls for red, orange, green, blue, and purple - the batter is yellow so you don't have to dye that one. Don't fill them all the way because you need room to stir.

Photobucket

I used Wilton Icing gel dyes. They can be purchased just about anywhere in the cake decorating section of a store. I used:

Christmas Red
Orange
Leaf Green
Sky Blue
Violet

You can use any food coloring, but this is what I had. If you go this route you'll also need toothpicks. You dip a toothpick into the bottle and the gel sticks to it, then you stir it into the batter and discard it. I only used one dip for each of the colors you see here, and of course you never ever double dip the toothpicks! Ew!

I used white baking cups in my muffin pan, because that's what I had. I do a quick spray with Pam or similar nonstick spray on the baking cups.

I baked an entire test batch a few days beforehand to learn the hard way that you only need a little of each color. The spoons in these photos are the bigger size spoon that comes with a standard place setting, and a spoonful of each color in a cup is too much. So use less than that, really!

I'd also recommend doing all 6 colors into a couple cups first to get a feel for how much batter will wind up in the cups. Then you can switch to doing all the red, then orange, etc. assembly-line style.

Like this.


Photobucket

I put each new color in the center of the cup, so it ends up looking like this.

Photobucket

Photobucket

Then you bake as directed - for me this was 20-25 minutes and they needed about 23. Once they cool, and YES WAIT UNTIL THEY COOL, you can frost them. I made my own buttercream using this recipe from Bakerella:

Easy Buttercream Frosting

1 cup (2 sticks) butter (room temperature)
1 teaspoon pure vanilla extract
1 1b. 10X powdered sugar
1-3 teaspoons milk, half and half or cream

* Using a mixer, cream softened butter and vanilla until smooth.
* Add sugar gradually, allowing butter and sugar to cream together before adding more.
* If you want your frosting a little creamier, add a teaspoon of milk at a time and beat on high until you get the right texture.
* Then, just use icing colors to tint the frosting the color of your choice.

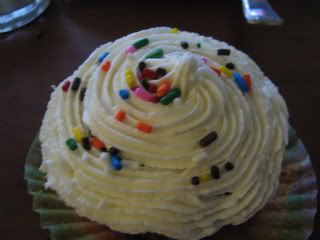
I used a #21 Wilton star tip to frost them in a spiral. I cooled them on a cooling rack over a dish, so when I put on the sprinkles I could collect the escapees underneath to cut down on the mess.

I *think* that one batch of frosting would have frosted the 30 but I had some from the day before and used it too.

Photobucket

Photobucket

Photobucket

Wednesday, September 23, 2009

Mom and Daughter Headbands

038

As part of a trade for some cloth diapers with my friend Mel I agreed to make her daughter some headbands. She hinted that a mother-daughter matching set would be nice, and after getting feedback on a couple patterns I got to work. I liked the look of pepperknit's Lace Headband but the lace pattern itself just wasn't lacy enough. I liked the lace from Persnickity Knitter's Arrowhead Headband but not that it was just grafted together into a fixed circumference. So I used the i-cord and increases from the Lace Headband and the lace chart from the Arrowhead Headband.


025

Sorry Zee. You can work this out in therapy in thirty years if you need to.

For the daughter version, I altered the arrowhead lace chart by removing the two stitches on each side of the center. This made it 7 stitches wide instead of 11, so it was appropriately daughter-sized.

052


A little closer on the lace here.

055


My Ravelry project page is here: Mom and Daughter Headbands.

Tuesday, September 8, 2009

So Pretty

I spent all day with this yarn.

236


The colors are represented best here in the first photo. The yarn is Blue Moon Fiber Arts Socks That Rock in Covelite. I bought it at Rhinebeck back in 2007 and have been afraid to touch it!

It was a long day; Spike had a decently high fever as these things go so he wasn't up to his usual antics, but of course I worried about him and things I can do nothing about. Winding up some yarn cakes turned out to be just interesting enough to keep him from glazing over but not fall asleep standing up.

Here is is, Mom.

235

Did someone say yarn cake?

237

There's been an unfortunate lack of real cake lately, although there has been blueberry pie. But more on that later.

I started swatching the yarn for something special.

264

Nope - not telling what it is yet! I think I know what to do now, but I've got to finish up some works in progress first. Other than taking up needles, time, space, and brainpower, current WIPs now are linked over on the sidebar to their Ravelry pages and I don't want the blog to get cluttered!

I blocked the Daughter headband today in the Mother/Daughter set. Photos soon!

Friday, August 28, 2009

The Big One

I'm speeding along on what has to be my largest yarny project to date - a Season 12 Doctor Who scarf. (Ravelry link; login required) (I'm working on getting those cute little Ravelry icons to indicate that)

This is how The Scarf spends most of its time right now.

058

I can't very well knit on it with children and cats running rampant when unfurled, but I did lay it out for a photo. I'm not sure how long it is right now, but I am on row 700 of 1042. At 50% it was about 6 feet long so I expect it to be about 12 feet unstretched at the end. And oh, it will stretch. And then there's the matter of fringe.

051

I know, it's hard to see with those shadows.

This one is kind of fun since the edge casts an interesting shadow.

054

The big blob in the middle is the shadow of the infant bouncer that Zee was in so I could take these pictures. Spike desperately wanted to walk along The Scarf like a balance beam.

These pictures were taken with the wrong side showing. I know that's silly, but I think it's more interesting. The right side wouldn't have those single beads of color exchange when I changed colors - it just goes from one block of color to the next. This is just a feature of garter stitch.

052

I think the grey/orange transition is my favorite. The colors just glow against one another!

Lest you wonder if I'm tall enough to wear a 12 foot scarf, I'm not just making this for myself or for fun. My friend Barbara asked me to make this as a gift for her husband. As far as I am aware, he is not 12 feet tall either but I'm sure he can still rock The Scarf.

The particulars...

Started: February 18, 2009. I even made a spreadsheet to track my progress.
Pattern: The Season 12 scarf from doctorwhoscarf.com. What a site - they also have some interesting history of The Scarf.
Yarn: Knitpicks Wool of the Andes in red, mist, thyme, chestnut, snickerdoodle, pumpkin, and amethyst heather. I just listed those colors from memory.
Needles: Size 8 circular aluminum Boye needles. This needle is a workhorse and perfect for the job.

One of the coolest things about this project is the scarf bar. Some intrepid soul built the Scarf-o-matic, and because of this very smart idea I can tell you that this is how far along I am.


Brilliant!!

My goal is to finish by the end of October so that I can weave in ends and fringe in time to deliver the scarf by the deadline, early December. But if I can get finished earlier, so much the better!

Wednesday, August 19, 2009

First Post

Everybody's got one, right? Well okay, here's mine. I'm Steph, aka Yarn. I enjoy quite a few hobbies (some of which you can guess!), but I'll let them come tumbling out as we go. I do have two little boys and caring for them is my occupation, lifestyle, and pleasure - most of the time, anyway. ;)